

Hey Everyone, welcome back to Technique Tuesday.
The other day when I was looking for a specific bag pattern which I never did find I found this ruler or I suppose you would call it more of a guide in the basket of patterns. It had never been opened and was still intact in its package. It is called The Angler 2 by Pam Bono Designs.
I have no idea why or when I bought it. Maybe I received it as a gift or it was in a goodie bag from somewhere – no idea.
Today I pulled the packaging off and read the directions. Seems like it might actually cut out the step of having to draw lines across the back of squares when making snowball blocks, flying geese blocks, mitred corners, half square triangles and the stars that are in my Animal Party quilt. I wish I had known I had this tool way back when I was making all of those stars for my Animal Party quilt. As well it can be used as a guide for sewing a perfect ¼″ seam allowance.
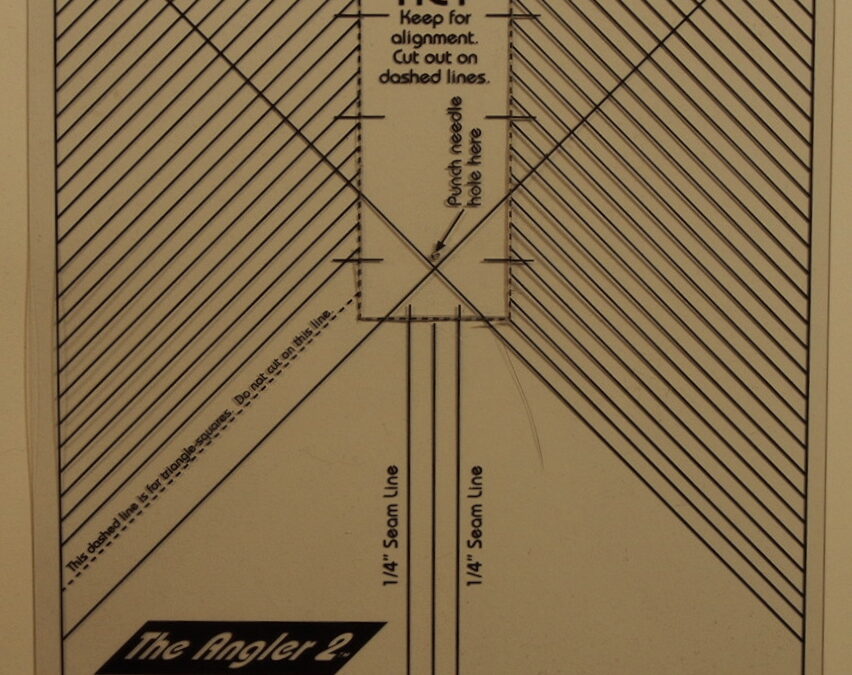
I figured I might as well try it out and see if it does what it says it does. Before starting I had to cut the middle U shape out as that is the area of the ruler that sits under the foot and the machine needs a clear space to feed the fabric through and sew it together. But don’t throw the piece away as it is also the guide for placement of the ruler.

Cut out the U shaped piece in the middle before using
The piece that I cut out had a marking where the needle would be on the machine. I had to punch a hole through the plastic so the needle could go down into the hole and secure the alignment guide.

Needle through the hole in the U shape piece
After fitting in the ruler to the guide I then secured the ruler to my table and machine with masking tape so that it would not move while sewing. The diagonal lines all the way around are for mitred corners, while the middle straight line is the one to use when adding corner units and the three straight lines are to help sew a perfect ¼″ seam.

The tool secured down with masking tape
So far so good. Guess I will give it a try and see if it works.
Snowball block in the process of being made. I have to say it works pretty good to sew the little squares down from corner to corner.

The snowball block set up for the second corner to be added – the bottom corner is aligned with the middle line
I did try using larger pieces to make a flying geese unit but can’t say that I liked it as well with the larger pieces. Great for the small pieces though and for only covering a small amount of the main fabric.
The next time I make snowball blocks I may just use this rather than draw lines and I could probably move over just a hair as I do when I have a line to allow the piece to press over to the corner better.

Snowball block complete
A good find in my box of patterns. I’ll put it in my ruler drawer now so I know where it is and remember to use it.
Do any of you have The Angler 2 and do you use it?
Happy Quilting!

Disclosure Note: I buy and use the products mentioned in this post and write about them without influence from the designer or any other commercial interests. I have included links to the products on Amazon.com and may receive a small commission if you purchase from these links. This doesn’t cost you any more to purchase these items but it does help me maintain this website, so I hope that you will please use these links.


Hi Jen, I have an Angler and used it many a time with my basic Pfaff machine. My new machine, a BabyLock has a built in laser light that shines a beam of light you can follow without using special attachments like the Angler. I have also taught students in class to just run a line of masking tape along the center of their needle bed to follow for simple corner to corner sewing. Again, that will get rid of that pesky step where you draw lines on the fabric.
I like the Angler, I like the masking tape idea and I really like the lase light. All of them work!