

Hey Everyone, welcome back to Technique Tuesday.
This week I am going to talk about how to make a basic Bargello.
What is Bargello?
The definition according to most dictionaries is: ”a needlepoint stitch that produces zigzag lines”. Quilting has adopted this age old technique, originally made with multiple colours of thread, using multiple coloured fabrics to reproduce a similar effect. With this method there is lots of movement within the quilt design due to the contrast of fabrics side by side.
The key to making the Bargello design work is to have a fabric run ranging from very light to dark. Many Bargello quilts are in a monochromatic colour scheme while others are made with a complementary colour scheme. Monochromatic uses only one colour while complementary uses two that are directly opposite each other on the colour wheel.
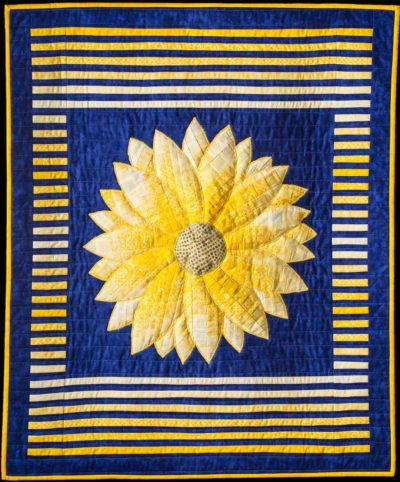
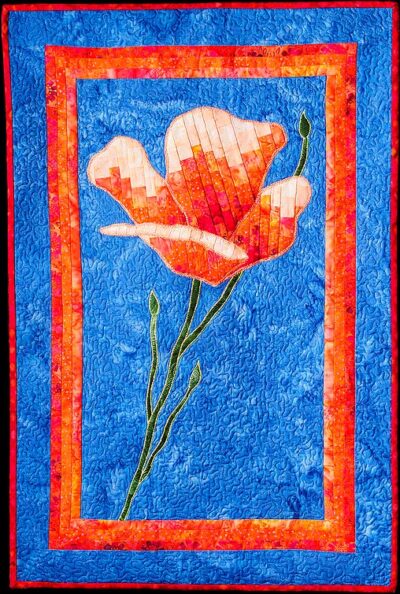
Here are three of my most popular patterns. All of these use Bargello technique to create a magical three dimensional feel in the flowers:


Choosing Fabrics
I find this step is the longest part of the whole quilt building process. After playing with many purple fabrics both from my stash and Simcoe Sew & Quilt I finally decided on a monochromatic colour run of purple. My colour run is only 6 fabrics and ranges from light to dark. Check out my previous blog post on picking fabrics for Bargello quilts.

Fabric run from dark to light
To make sure I have the fabrics sorted as per value I took a photo and then turned it to black & white to take the colour out. This helps to see what value the fabrics are – light, medium or dark. The key is to have a colour run that moves easily from each fabric to the next but still has enough contrast to see the differences in the value of the fabrics.

Photo changed to B&W to make it easier to see the value of the fabric
To Begin
Cut strips of each fabric the width that you desire. For this Bargello I cut my strips 1 ½″ by WOF. Then I ended up cutting them in half so they were only 21 inches long. Mark each fabric A – F or more depending on number of fabrics in the run.

Fabrics cut into 1 ½″ strips
Sew the strips together in order from light to dark. Press the seams towards the darkest fabric. My fabric runs are a bit different in that I have put the darkest or the lightest in the middle. This is because I am using them for something specific and will be cutting them up. Normally the lightest fabric would be next to the darkest to have two complete runs of the light to dark.

The strips sewn together
When sewing the strips together it is okay if they are not all be the same length. This is normal as not all fabrics are manufactured the same length. For more information on sewing strip sets together check out my blog post on this topic.
Create the Bargello Tube
Make a tube with each colour run of fabrics by sewing the two free ends together.

The fabric strips turned into a tube
Cutting the Bargello Strips
Turn the tube right side out and lay flat on the cutting mat. Square off the left hand end with your rotary cutter and ruler. I use the Olfa 28mm or 45mm rotary cutter and Omnigrid 8 ½″ x 24″ inch ruler but a 6 ½″ by 12″ would work as well depending on how wide the tube is.

Line up ruler on left hand edge and square off

Fabric tube squared off
Flip the tube over so the squared off end is on the right hand side of the mat. If you are left handed everything will be reversed.

Cut first strip as instructed
Cut strips of varying widths along the tube. Make sure to line up the horizontal line of the ruler with the top of the tube and stitching lines to maintain square strips.

Strips cut and ready to open up
Make sure to cut in order as instructed – this ensures that the patterns within the fabrics are maintained and they flow throughout the Bargello.
Opening Up the Strips
If you are following a pattern it will give instructions to open up the strips at specific spots on each strip. Open up by removing the seam with a seam ripper. It will often read “open between fabrics A & B placing fabric B at the top of the design”. You can either follow a pattern which most people do or make up your own which I have done here.

One strip opened between fabrics A & B
Continue doing this until all the strips have been opened up. When they are laid out in a row a design forms.

All the strips opened up and ready for sewing together
Sewing the Strips Together
Sew strip one to strip two, strip three to four and so on. Bargello designs are made by staggering the fabrics either a whole square or half a square. This design I have chose to stagger a half square which means there are no seams to match up – bonus.

Strips sewn together in pairs
Continue sewing all of the strips together until finished. I highly recommend labelling the strips 1 through to whatever to ensure they do not get moved around accidentally. This will prevent having to rip out when the design doesn’t look right.
Speed Sewing Tip: Chain sewing works when the strips have been labelled.
Press all the seams in one direction.
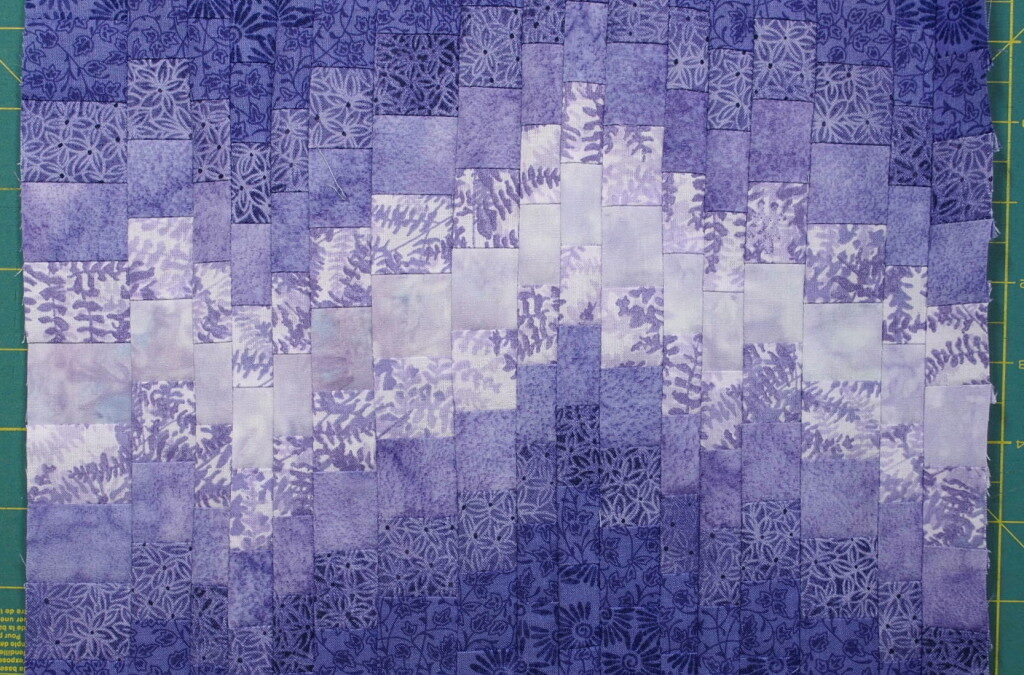
All the strips sewn together to create a Bargello – the size of this piece is 11 ½″ x 12 ¾″
There you have it – a quick tutorial on Bargello. Want to learn more? I’ll be teaching a beginner Bargello class at Country Concessions in Cookstown at the end of the month, May 24 & 31. Hope to see you there.
Happy Quilting!

Disclosure Note: I buy and use the products mentioned in this post and write about them without influence from the designer or any other commercial interests. I have included links to the products on Amazon.com and may receive a small commission if you purchase from these links. This doesn’t cost you any more to purchase these items but it does help me maintain this website, so I hope that you will please use these links.


I love bargello! Great tutorial!
Thanks.
Never ever thought I would do a bargello strip and have no immediate plans but having seen this fantastically clear explanation I now know I could if I wanted to. Amazed in Venezuela!
Thanks Juliet – looking forward to seeing yours from Venezuela.
Wow…love your tutorial; and you made it easy to understand. Great colors too.
Thanks Marjorie.
The tutorial is clear and the colours wonderful. thanks
Thanks Elle. I just used those colours yesterday to create a tulip – looks great.
That makes it very clear–I particularly like the hint to change a photo to black and white to check the value of the colours. A great tip!
Thanks Margaret. The changing of the photo to B & W is a huge help with value – I do this constantly when picking fabrics especially colour runs.
Wow…thank you so much for this tutorial:)
How do you change a photo from colour to black and white – I have Picasa and My Pictures but no Photo Shop. Not sure which day this tip belongs to – Technique Tuesday?!
Hi Juliet, that’s a great question, so I’m glad you asked. There are probably as many ways to do this are as there are varieties of mustard. Haha. Anyway, possibly the simplest and most immediate is to go into your camera’s style settings and select “black and white” and then the pictures will be in black and white right from the start. Using Picasa (I’m assuming you have Picasa on your computer rather versus on the web) when you double click a photo to go into the edit menus, you have a number of tabs with a little brush icon on them and on one of these tabs is a black and white filter that you can click and presto, a black and white view of your image. Try these and see how you go with it. Hope this helps.
Nice tutorial, Jen! I’ve always wondered how to make one of these! Whoop whoop!!
yay. Thanks Sarah. Bargello’s are so much fun once you see how it’s done.
Really nice instructions. I wish I was closer, would love to make the Bargello Flower..hint, hint!!!
Pat
Great tutorial…..I love bargellos and so love your flower. It is great. Thanks for the hints!
Thanks for the easy to follow instructions. I am new to quilting and self taught. I wish others explained so well.
Great instructions!
What do you do to finish the piece?
Susan, I then square it off and add a border or two.
It would be great if you included a photo of your bargello sample with the border/s added.
Hi Susan
This bargello actually got cut up and used for a flower so never had a chance to add a border. Here is one that did get a border http://quiltsbyjen.ca/bargello-in-autumn/
Jen
Obrigada, seu tutorial me ajudou muito! As explicações estão ótimas. Vou fazer uma mala de viagem em bargello. Mais uma vez obrigada por suas orientações.
Telma, Você é muito bem-vindos. Jen
Wonderful tutorial, & I LOVE the purples, lol.
I only wish it was available as a pdf download, so much easier then to actually use.
Thank you for posting this — very well done!!
Thank you. You can save the post to your computer as a PDF. Go to your print menu and pick save as PDF. Happy Quilting Jen