

Hey Everyone, welcome back to Free Motion Friday.
As I sat looking out the window watching the snowflakes drop to the ground and pondering what to do this week for free motion Friday I figured why not a snowflake.
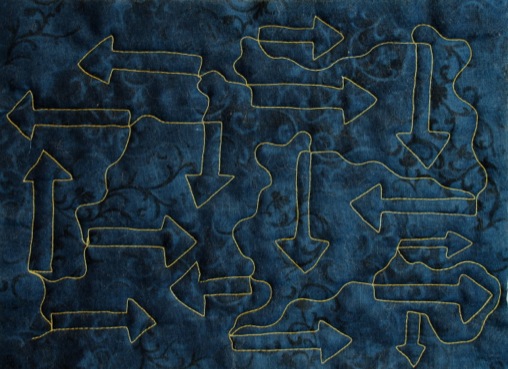
Okay I know these don’t look like snowflakes but the first snowflake I made had tentacles on it that looked like arrows so I switched to arrows or maybe they are one way signs.
When I was all done creating these arrows I looked over at the squares I had sitting left over from the layer cake I used the other day and there were one way signs on them. Karma or what? I guess I know what motif I will be using to quilt that quilt with.
This is another one of those motifs that could be done with a walking foot if you were to make them bigger and not an all over design. Marking them out before hand would probably be helpful with the walking foot.
Follow these steps to create these great one way signs.
Step 1
Start with the free motion tail that continues up the straight edge of the stem of the arrow, make a sharp 90 degree turn and stitch straight for a bit then take a 60 degree run up to the point which would like up with the middle of the stem of the arrow.

Stitch the bottom side of the arrow first
Step 2
Go in reverse down the other side. Make the other side of the arrow and take a 30 degree turn sewing straight for a bit and then make a shape 90 degree turn to complete the stem of the arrow. Continue with another 90 degree turn at the bottom to connect the two sides of the stem.

Top side of arrow stitched to complete arrow
Follow the Arrows

Arrows show the direction of sewing
A fun little motif especially for a kids quilt or a boys quilt.
Happy Quilting!


Thanks for this….I’m am such a newbee and love this!
You’re very welcome Maureen. If there’s every anything you would like demonstrated or explained, just drop me a note and put it in the pipeline for a blog post.