Hey Everyone, welcome back to Story Time Monday.
Finally I have completed the Dahlia quilt. It has been in the works for a while but now is officially finished except for the label which will be added shortly.
About the Give-Away – Really Important – Read this
Before I get into all the details about this quilt, I want to let you know about the give-away. Yes, I’m giving away the first pattern off the printer to a lucky winner.
The entry form is at the bottom of this post, so don’t miss it! You have to use the entry form to win! Contest is now closed!
And share share share this giveaway! Don’t worry – if you refer a friend and your friend mentions you in the comments below, I’ll make sure you both get the pattern if your friend wins. So share!!!!
About the Dahlia Quilt
This flower I designed back in April with the Leaves Galore rulers by Sue Pelland Designs for the Country Concessions booth at Creativfest. It was a fun quilt to design and lots of fun to quilt.
I had originally made the yellow Bargello run for my Sunflower Quilt which, by the way, was mentioned on Joyce Bowers blog Delightful Quilting yesterday. The yellow run was just too bright for the sunflower so I put it aside to use for something else. When it came to making the dahlia which originally was to be a daisy except it looked more like a dahlia I thought the yellow would be perfect and it was.
For the background I picked a blue purple fabric which highlighted the yellow perfectly. In future though when I pick a background fabric I will make sure that I have way more than I need. Seeing how I had only a small amount left that meant I was limited to what I could do for the border. More about that in a bit.
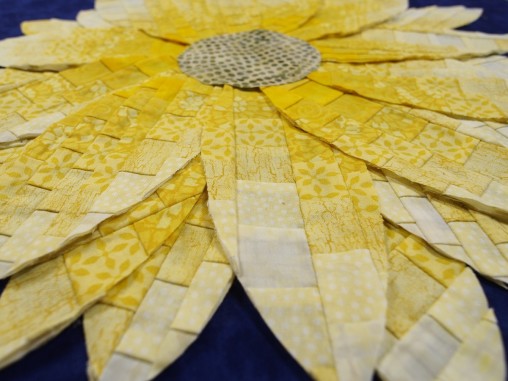
With the sunflower I drew all of the petals onto the fusible web and then cut them out and placed them onto the back of the Bargello run. This time, with the dahlia, I fused a large piece of Lite Steam-A-Seam 2 onto the back of the Bargello run covering the whole run. I then used the large Leaves Galore ruler to fussy cut out the 8 inch petals that are seen in the front of the flower. The medium sized ruler was used to fussy cut 5 inch petals to slip in the back between the larger petals.
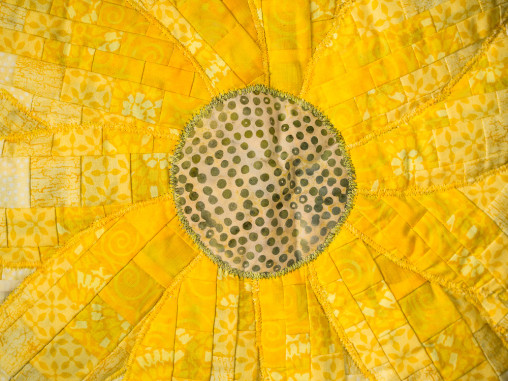
Instead of piecing a centre for this flower I picked a single fabric to use as the centre. The green & yellow spotted batik works great.
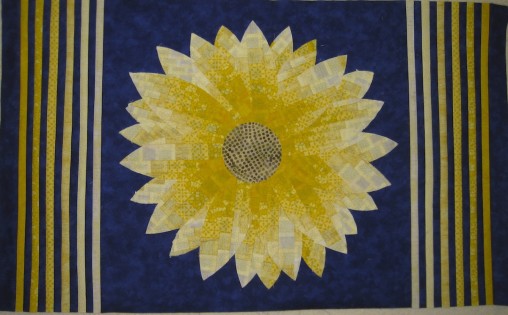
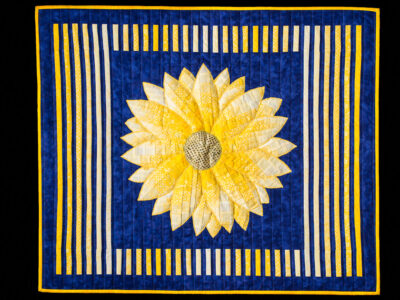
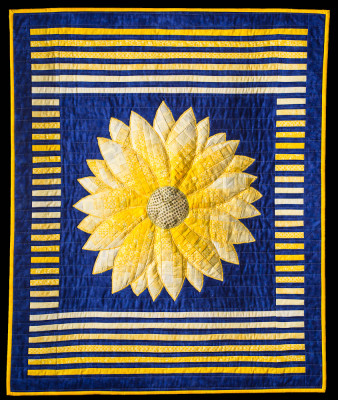
The flower sat for a bit until I decided what kind of borders I wanted to put on. I settled on a striped border using the fabrics from the flower and the background. Originally I had made 4 identical borders for the sides and then discovered that I didn’t like them all the way around so only used two.
To read more about the making of this border check out my blog post on making a simple and effective striped border.
That settled I then had to decide how I was going to quilt the dahlia and background. I knew I wanted to use the free motion zigzag stitch around the edge of the petals but I also thought what if I trapunto the flower. I figured why not, I have nothing to lose and so I tried it. Trapunto is when a bit of extra batting is added to give some lift or loft to a certain area of the quilt or design. I used a piece of polyester batting as the extra bit as it has more loft to begin with.
The trapunto turned out great and the centre of the flower even ended up with some texture to it making it look more real. This resulted because I stitched the petals first rather than the centre of the flower. A great design effect. I spent the day quilting this with some of my friends from the Meadow Lane Quilt guild at Anne’s house.
Next the background, but I was still not completely happy with the border. The day I stitched the flower Anne had added a striped border to her sunflower quilt which was left over from the centre of the flower. I really liked the look it gave and I thought what if I cut up the two remaining borders into narrower pieces and use them on the top and bottom or sides depending which way the quilt is hanging. A little bit of math was required along with some removing of stripes in order to get things to be symmetrical and fit. I put everything in place to audition it and loved the results.
Now I had to add more batting and backing to the quilt seeing how I had cut everything for the size it was with only the two borders. Can’t say it is really much fun adding on borders, backing and batting when some of the quilting is already done. Plus I had to match up all the stripes seeing how everything was added on as an afterthought. Everything matched thank goodness. I had enough of the background fabric left to add a border all the way around and I am extremely pleased with the look.
The background I quilted very simply using the walking foot with straight lines an inch apart between the yellow stripes.
Now comes the question of the hour – which way do I hang it? I have put sleeves on all sides so it can be hung either orientation. Only one way for the picture on the cover of the pattern though.
Which way do you think it should be? Tell me your preference in the comments and enter for a chance to win the Dahlia flower pattern!
Here’s the Contest (You have to enter here to win!):
a Rafflecopter giveaway
Once you have left your comment hit the +3 button above.
Happy Quilting!

Some notes about the contest:
Contest is open now and closes Sunday night, the 16th of July 2013, at Midnight.You have to comment here on the blog. Facebook comments are welcome but they won’t count in the giveaway.You have to enter using the Rafflecopter widget just above my signature.The more you share this, the more entries you get in the contest. Yes, you have to leave a comment to win.Refer a friend bonus: if you refer this to a friend then tell them to say you sent them in their comment. If they are the winner, I’ll send you each a pattern.Anyone, anywhere in the world, can win. (Provided, of course, that it’s legal where you live. You won’t have to pay shipping, but you will be responsible for any taxes, customs or import duties if they are applied along the way.)- Contest is now closed!
I shared this post on Stitch by Stitch, Quilt Story – Fabric Tuesdays, Freemotion by the River, WIP Wednesday, The Needle and Thread Network



I love the horizontal orientation best. They are still both so beautiful!
I enjoy your work and hope I win the pattern.
Keep on quilting! 😀
I love it love it love it and then I love it horizontally first and diagonally second, but I love it all ways, fabulous effort..
Oh, it’s so tempting to delve into the world of quilting when I see your gorgeous work!
Leanne – delve away, come for a lesson!
I am so thrilled you’ve finished this. I like the wide orientation, with the stripes running vertically. Your eye goes straight to that gorgeous flower instead of being caught by the stripes first.
Thanks Mary, I am very pleased with the finished piece as well.
Decisions, decisions. I thought I liked it horizontally until I saw it vertically, so it’s definitely vertical. But it’s incredibly gorgeous either way.
Thanks Laura
I like it horizontal. Congratulations on a beautiful finish either way.
Thanks, Ann. I think this is going to be a close vote.
Vertically is my favourite but I love the way that it can be placed either way according to the available space. Well done!
Thanks. Yes, I to like how it can be placed either orientation as well for space available,
Jen, I love it both ways, but vertical the best. The colours are lovely. Love it!!!
I like the horizontal the most
I prefer the horizontal option, the dahlia is gorgeous in both. You have done an incredible job Jen, its stunning.
This is a gorgeous project. I really like the horizontal setting. That’s my 2 cents
Have a great day!
That is an absolutely stunning creation, Jen! And I do mean STUNNING! Personally, I like the first photo best which you refer to as the horizontal version. Either way, you have really created quite an incredible and STUNNING quilt. Kudos to you and your amazing mind!
I love this pattern. The dahlia catches my eye.
Personally, I love it hung vertically.
Optical Illusions…
Vertically looks like a close up.
Horizontally looks like a mountain view.
Love your work, thanks for sharing
and inspiring.
I would hang it horizontally. I have Sues rulers and would love to try this.
Thanks for the opportunity to win.
Bunny
Love it either way but think I especially like it hung vertical
Love it both ways but vertical is first choice.
At first I liked the horizontal best but then I looked at both of them on the screen together. I think the horizontal one looks like it is seen through a window or camera and the vertical one looks like it is surrounded by sunshine so my vote goes for the vertical one!
So lovely! I think horizontal is best!
Beautiful Dahlia. You did a wonderful job. The narrow stripes at the top were a pleasant surprise. Definitely, the horizontal orientation is best. To me the vertical orientation looks like it is stuck in a box.
Thanks Rose-Marie. The narrow stripes really make the whole piece a bit different don’t they? I’ve created several of these bargello flower wallhangings now and I’ve challenged myself to create a different border for each one.
This quilt looks great both ways, but I think the Horizontal format shows off the beautiful flower much better. You did a wonderful job!
Thanks
Your flowers are gorgeous. I prefer the hoizontal format.
I am interested in the other flowers, especially the rose.
I like the long stripes and the top and bottom. I think the “weight” should be there rather than on the sides.
I like the horizontal view, although both views are very attractive!
I like the Vertical Look.
I can already imagine this Dahlia in a variety of colors that would make an absolutely stunning quilt, as I grew up with Dahlia’s in our garden every year. It brings back wonderful memories that can now be recreated. Thank you!
Oh, and the horizontal seems to bring out the color the best. Thanks again.
Thanks Helen, I’ve had students make it in a few different colours. It’s such a fun flower. We have an enormous plant by our front door this year with 15 flowers on it. Love it.
I think I like it more horizontal than vertical. I wonder how this would look in a different color scheme.
I really like the horizontal version. Thanks for sharing
Thanks for the chance to win! =)
I think it is more dynamic horizontally hung.
What a beautiful work of art! I prefer the horizontal orientation. The extra care you took in color gradation of the stripes is fabulous.
Thanks Laura!
I agree with Rose-Marie…I like the narrow stripes at the top; unexpected….just lovely. I’ve done several Dahlia quilts, but not this way…it is unique and lovely
I like the horizontal version best!
Beautiful! My favorite layout is the vertical.
That sunflower is beautiful!
Here via WIP Wednesday!
Vertical. I like them both. I would probably like to use the quilt as a wall hanging (which depends on the final size if that would be an option for me) I pick the vertical layout.
I think I like the horizontal better.
I love the hoizontal Great Flower
I like the horizontal version. Seems to have the most impact.
I like the vertical view, but either way, not only is it beautiful it is very inspiring!!! Thanks
I like the vertical orientation – I think the horizontal version is more ‘expected’ so the vertical version kicks it up a notch…. 😉
I really like it with vertical stripes. Beautiful quilt. You did a fabulous job of giving the petals dimension.
I like the horizontal layout. Such an amazing quilt, perfection right down to. The end. Thanks for holding a give away!
I prefer the horizontal view.
I prefer the Horizontal version as the vertical draws your eyes away from the flower and the horizontal draws them into it.
It is absolutely beautiful and I’d love to win the pattern and make this but I like red dahlias.
What a beautiful sunflower and I like the borders running horizontally! Thanks for sharing.
Freemotion by the River Linky Party Tuesday