

Hey Everyone, welcome back to Technique Tuesday on Thursday. Just mixing things up a bit this week after CreativFestival. Next week everything will be back to normal or at least I hope it will.
A few weeks ago I wrote a post on how to make templates from tissue paper. I used a cookie cutter for the template.
Today I am going to show you how to use the tissue paper template for quilting with a different motif. The ribbon of trees I free motion quilted a couple of weeks ago.
I traced the motif onto the folded tissue paper.

Motif traced onto tissue paper
And then stitched along the lines with a sewing machine – no thread in the machine as I just wanted the holes in the tissue paper as the motif outline. Making the stitch length smaller will make it much easier to rip the paper off when done.
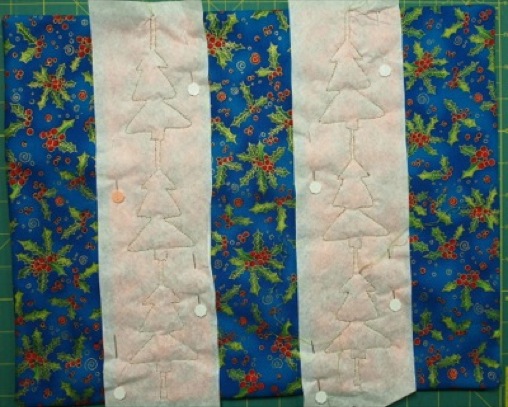
Trim off the folded edges of the template and pull apart into single sheets. Pin the template onto the area to be quilted. If you notice this is one of the placemats I made for the senior’s home in Orillia for Christmas. Slowly I am getting them quilted.

Templates pinned in position
Stitch from the top to the bottom of the motif with either free motion or a walking foot and then stitch back up the other side.
Rip off the paper from the outside. This what will be left.

Centre of motif still with tissue paper in place
Remove the paper from the inside of the stitched area. Sometimes little pieces of tissue paper can get stuck in the stitching and I use a pin to scrape them out of the stitching.

All paper removed around stitching

Close up of stitching
Tie off your threads to the back of the quilt and bury the threads. Using a self threading needle will make this so much easier.
There you have it – how to use tissue paper templates.
Happy Quilting!


Trackbacks/Pingbacks