

Hey Everyone, welcome back to Stitch Along Sunday. Already the third Sunday of the month – where do they go so quickly?
If you missed last weeks post you can find it here at Stitch Along Sunday – September Week 2.
The rules for this week can be found on Ruth’s blog at Rules – September Week 3. Also don’t forget to check out the Gallery if you missed what Ruth and others were up to last week.
You can see Ruth’s piece for this week on her blog Ruth – September Week 3.
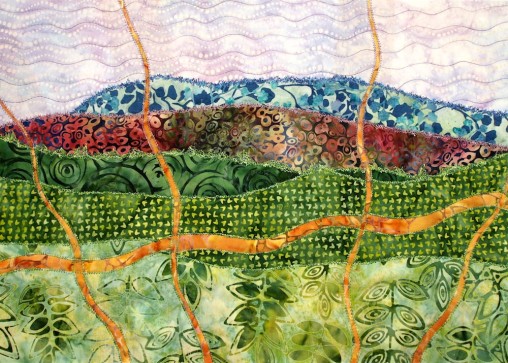
A little bit of stitching was to be added this week – a decorative one or a zigzag. Something different than what I would normally use. I have to say though that I didn’t venture far with the stitching on this one. I did use a different stitch though to secure down all of the raw edges where I put in the fracture strips. Seeing how I had fused them in place with Stitch Witchery and didn’t piece them there were many raw edges showing which would eventually fray if not stitched down.
First of all I sandwiched the three layers and pinned them together with curved safety pins. I decided that this stitching would also act as the quilting.

Layers sandwiched & pinned together
The stitch I chose to use is kind of like zigzag but a bit different. I chose this one because I could make it narrow so as to just cover the edge of the fabric and not obscure the fracture lines seeing how I made them quite narrow.

The stitch on the machine screen
Here is a close up of the stitching. I used a green variegated thread for the shrubbery section and a mauve variegated thread for the mountain and sky section. Both threads were King Tut by Superior Threads.

Close up of stitching along fracture strips
Once all the stitching was done I had a whole bunch of thread ends to pull through and bury with one of my favourite tools, the self-threading needle. Just part of quilting for me as this is how I always tie off my threads – it works for me and I am happy with the results.
The next task was to add some more stitching to the piece. The sky fabric has wavy lines of circles across it and so I mimicked those lines with some free motion quilting. Going between every other one helped to enhance the light coloured sky.

Close up of stitching in the sky
I chose to do free motion zigzag along all of the edges of fabric to differentiate the sections of the quilt. I made them fairly jagged and uneven rather than uniform and even. This helps to give the idea of a jagged mountain and leafy trees.

Close up of free motion zigzag
All ready for next time and I am definitely looking forward to it – I wonder what Ruth will have us add or do.
Happy Quilting!


