

Hey Everyone, welcome back to Stitch Along Sunday.
Did you have fun making the little art quilt in August – I sure did. Now it is time to move on to a new one. Can you believe it is September already – back to school, back to work and back to routine for some of you after a summer of no routine. Maybe you could add in this little art quilt to your Sunday routine for something different to do.
This month’s challenge is very different from the last one and is also going to be lots of fun and get your creative juices flowing. Did you miss miss last post in August then check out Stitch Along Sunday – August week 4.
For today’s challenge here are the Rules – September Week 1 on Ruth’s blog. There is a photo you need to look at to get started. Plus don’t forget to check out Ruth’s Week 1 Challenge. Check out the Stitch Along Sunday Gallery.
Today’s piece is a small landscape – I have to admit that I doubled the size of my piece this week – not sure why other than I wanted to so it is roughly 11″ x 17″.
First of all I have to say picking the fabrics was a bit challenging as I just wasn’t quite sure as I kept pulling more and more out of the cupboard even after I had thought I had made my final decision. This is the first set of fabrics I put together. The mountain fabric in blue tends to get lost within the piece.

First set of fabrics
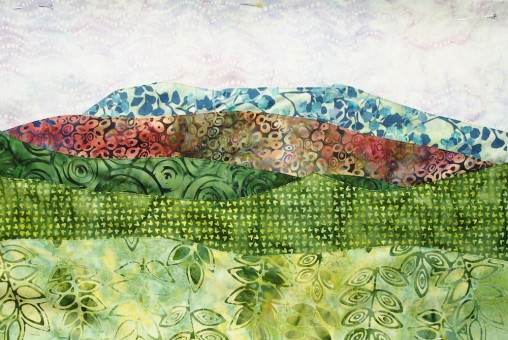
Then I added in a different fabric for the mountains and decided it showed up much better than the fabric in the first photo so went with it. This one has more life to it.

Mountain fabric changed
I drew out my landscape lines on a piece of paper.

Landscape lines drawn on paper
Next I traced them onto freezer paper to make my templates. Make sure to number the templates – mine are numbered from the top down in order which they will be layered together.

Lines traced on freezer paper
Then I cut out the templates on the lines.

Templates all cut out
Ironed them shiny side down to the right side of the fabric. The great thing about freezer paper templates is if you do not like where you placed it just peel it off the fabric and iron it down again where you want it. They can be reused several times.

Iron template onto fabric shiny side down
Cut them out with a half inch of space all the way around.

Cut a ½″ around template
I pressed under the top edge of each piece so it had a finished edge to sit on top of the piece beside it and hide the raw edge of the piece above. May need to clip some of the curves to get the edge to lie flat.

Edge of piece pressed under
I layered everything in place on a piece of tear away stabilizer which I had traced the pattern onto so I new the placement of each one. I used glass headed pins to pin everything in place that way if I needed to iron with the pins in the heads wouldn’t melt.

Layer fabrics in place and pin.
Each piece I stitched in place close to the edge with straight stitch using a matching colour thread in 60 wt. I normally would do this with a 100 weight thread but I didn’t feel like getting out my other machine as the one I was using doesn’t like the 100 wt thread.

Close up of stitching
All ready for next week.
Ready for next week
Happy Quilting!


