

Hey Everyone, welcome back to Technique Tuesday.
As promised last week in Cool Tool Thursday I said I would do a post on how to make your own fusible tape with the Clover Fusible Bias Tape Maker.
Some of the Quilts by Jen readers like video tutorials, some like the written tutorials and still others like to have both. I asked Michael from Houlden Studios Photography to help me create another in the series of Instructional Films today. These films always take a lot longer than we expect, so the video was added much later in the day.
Here’s the video version of this week’s Technique Tuesday with the written version right below.
What you will need
First of all choose the correct size of tape maker and fusible web to go with the tape maker. For today’s tutorial I chose the ½″ inch fusible tape maker which is the yellow one – great that they are colour coded.

A 10 mm roll of fusible web from Clover. This roll of fusible is specifically made for use with the fusible tape maker. It also comes in 5 mm width to go with the smaller tape makers.

A roll of 10mm fusible to work with the ½″ fusible bias tape maker
A straight pin, pair of scissors and an iron.
Cutting the fabric
Check on the inside of the packaging to see what size strips is needed to fit in the tape maker. There will be two different selections – one for bias tape and one for straight tape. When cutting the strips for the bias tape remember they need to be cut from the fabic on a 45 degree angle. The advantage of using bias strips is that they can be shaped into curves, waves, stems, etc as the bias easily curves and changes shape whereas the straight strips do not.

Cut strip of fabric – straight or bias
Making the fusible tape
I followed the package directions and fed the fabric in first through the bottom of the tape maker and then fed the fusible through the top of the tape maker. I found it difficult to get the fusible through the opening at the end as the fabric was in the way.
I then tried it in reverse and it worked way better so I recommend starting with the fusible first then the fabric as I do in the video at the end of this post.
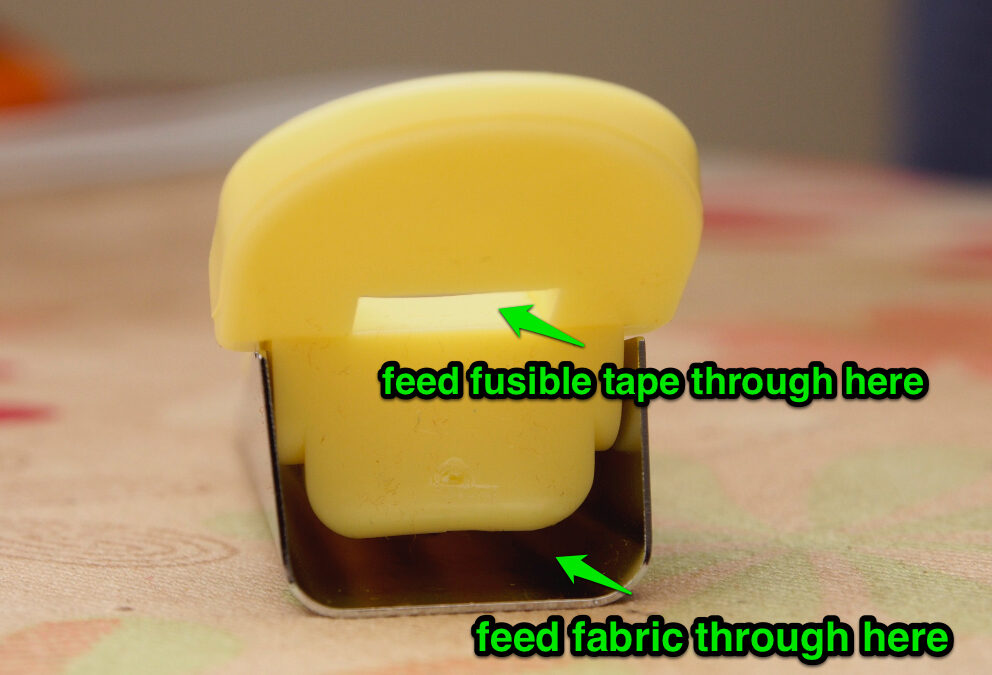
The back of the fusible tape maker looks like this and has separate openings for the fusible and fabric. The top opening is for the fusible and bottom opening for the fabric.
The back of the fusible bias tape maker
Feed the fusible through the top opening.

Feed the fusible tape through the top opening with the paper side up
Continue feeding the fusible along the top and under the silver bar at the end.

Continue feeding through to the end
Cut a point at the end of one piece of the fabric – this will allow for easier feeding through the tape maker.

Make a point on one end of the fabric
Feed the fabric through the bottom opening. Make sure the wrong side of the fabric is facing up.

Feed the fabric through the bottom opening
If the fabric gets stuck (and it usually does) just turn the tape maker over where you will see a slot in the bottom. The fabric may need some assitance in sliding along – use the straight pin to push the fabric along and out the other end.

Guide the fabric along with a pin if it does not pushing through the end easily
Fusible tape and fabric in position.

Fusible and fabric in position for ironing
Lay out the fabric on the ironing board with fusible tape centred on the fabric. Using a hot, dry iron press the fusible in place. Lift the tape maker up at a slight angle and drag it backwards feeding out the tape and fabric and at the same time push the iron towards the tape maker to fuse the fusible in place.

Press fusible in place on fabric with a dry iron
A piece of fusible ½″ fabric strip.

Fabric strip with fusible in place
Pull the paper off when ready to use.

Paper pulls off easily
It really is quite a simple process, a bit time consuming but a great method to make fusible tape in any colour or fabric needed.
I am thinking that my next flower centre will made with this method – no strip sewing of skinny strips, cutting and resewing, just weave the strips together and fuse it all down.
Tune in later today to see the video on this process – Michael is still editing it.
Happy Quilting!


