

Hey Everyone, welcome back to Free Form Friday and a bit of Stash Blasting Wednesday.
Next week CreativFestival is upon us – it always seems to be so far away and then all of a sudden it sneaks up on me and is only a week away. The week prior to the show is always a whirlwind of activity, creating last minute presentation designs, folding and stuffing patterns and of course gathering up all the bits required for the booth.
Right now I am in the thick of creating some last minute presentation designs. This year I am doing two presentations. One is called Using Up the Pre-Cuts & Scraps which is at 1:30 on Friday and 3:30 on Saturday. The second one is called Releasing the Rulers which is at 4:30 on Friday and 9:30 on Saturday. Those of you who are at the show please do drop by room 102 to check them out.
And yes, I have a booth with all my wonderful patterns and quilts – #206. Drop by and say hi.
I wanted to create something quick and easy with the 2 ½″ pre-cut squares. Alternatively, 2 ½″ squares from the scrap stash can be used but my scrap stash isn’t that organised – maybe one day it will be. To see the state of my scraps check out Mug Rug 15 where there is a great picture of the tangled mess.
Maybe if I did organise my scraps into neat piles, sizes and colours it would get used a little more. That can be a project for a rainy day in the summer.
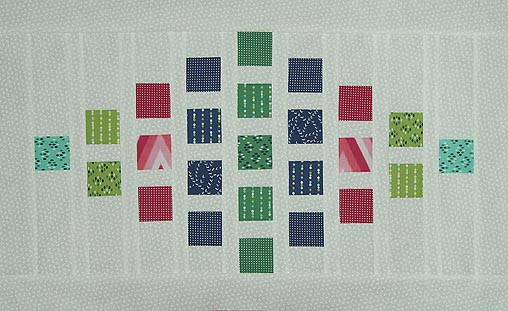
I picked out the darker squares from two 2 ½″ pre-cut packages of this Moda fabric called Color Me Happy and yes it is a happy fabric with lots of colour. In order to get the number I needed to create the layout I wanted I had to use two packs but I have lots left over to create something else.
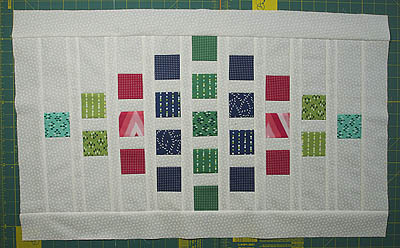
This piece is so simple and can be done from start to finish in a day. To begin lay out the squares and add in spacer pieces of the background fabric. I chose a white for the background since all of the pieces had white in them.
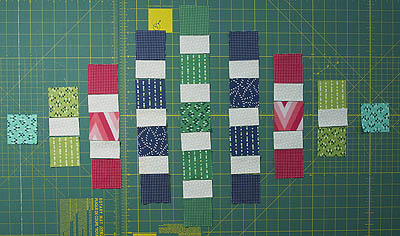
Spacers between squares
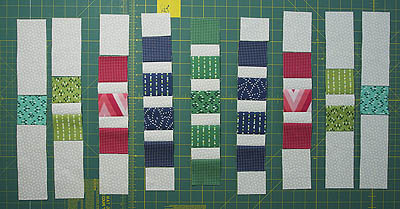
Then add more background fabric to the top and bottom of the rows to make them even with the centre row.
Background fabric added to top and bottom of rows
Next add in more spacer pieces between the rows.
Spacer pieces added between rows
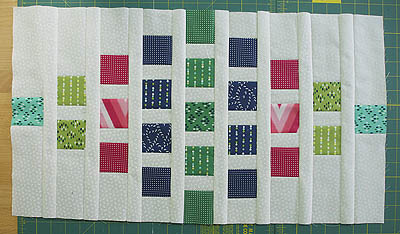
And finally add a border around the whole piece so the diamond appears to be floating. The piece is 18 ½″ x 30″.
Border added
If I were to make another one of these again, which I am pretty sure I will, I would want to eliminate the top and bottom border seams as I find them a bit distracting to the design. In order to still have the floating diamond, the top and bottom background pieces in each row just need to be made longer as well as adding some to the middle row.
This design would also work with charm squares or layer cakes depending on the size of the quilt you want.
Since I haven’t quilted this piece yet I must remember to set aside some of the white fabric for binding otherwise it will get used for something else and I’ll be short some binding. But that’s never happened to any of you, right?
I also need to get some white batting. If I use the unbleached natural batting the cream colour will show through the white fabric. Trust me on this I’ve had it happen before.
Must go, as there are more pre-cuts awaiting and calling out to be used – me next, me next!
Happy Quilting!


