

Hey Everyone, welcome back to Stitch Along Sunday on Friday.
As you know from my UFO Monthly Round Up post at the beginning of August I still had to finish a few of spring Stitch Along pieces – three to be exact – April, May & June.
I am very pleased to say that I have finished two of them – April & June, but still have a bit of work to do on May’s piece. I spent the afternoon at the cottage sewing on the bling to these two quilts as I enjoyed the sunshine and view of the water from the deck. I wish my studio had that view. I didn’t think to take a picture of the view to share with you. The next time I am there I will.
Binding & Bling
The two pieces that I finished needed binding which I chose to add traditional binding to each rather than facing the quilt.
The June piece I added in pieces under the binding which are not attached to the quilt other than the very edge under the binding. They add a bit of embellishment to the edge of the quilt. These pieces are a bit like adding in prairie points but instead all I used were rectangles of fabric and pressed the edge over on each so no raw edges were exposed to fray. I then attached each piece to the edge of the quilt as you would hanging tabs on the back. Not as fiddly as prairie points and no extra sewing but I do wish I had added some stitching on them just to give them a bit more dimension.
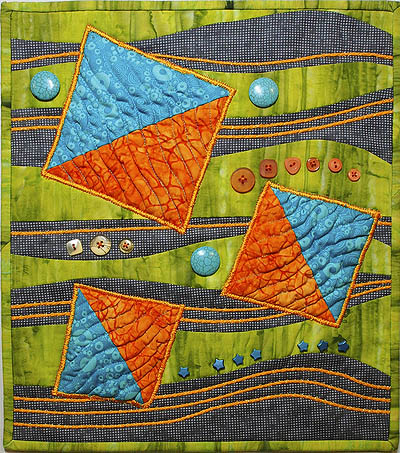
Beads and rectangles pieces finish off June’s stitch along piece
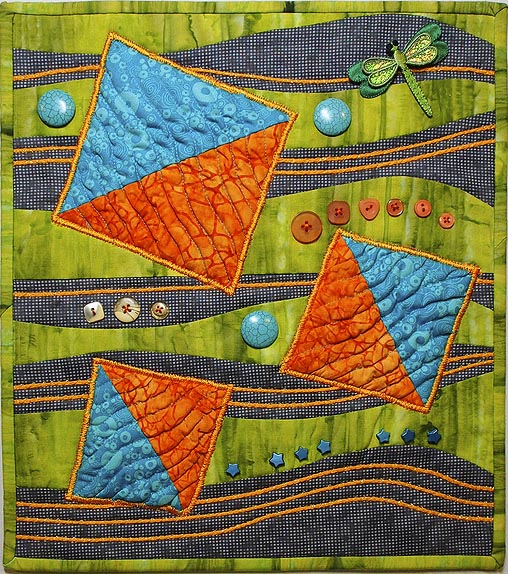
Both April and June’s quilts I added some bling to in the form of buttons and beads. You can see the beads in the piece above and the one below. Picking the beads took me just as long as it does to pick fabric for a project. I think I have too many beads – oh wait, beads & buttons are like fabric – can never can have too many. Embellishing a quilt can take it just that extra step from great to wow and give it a little extra pizzaz.
April’s stitch along embellished with beads and buttons
In the photo above I have left off the dragonfly and in the photo at the top of the page the dragonfly resides in the top right corner. Which do you like better? I am not sure so need your help deciding.
These mini art quilts are the basis for one of my classes at Creativfestival this fall October 22 – 26 at the Metro Toronto Centre in downtown Toronto. The class is called Mini Art Quilt Challenge and is a 6 hour class where each hour you will receive another set of instructions to continue building on your project. The class is on Wednesday October 22, 2014 from 1:00 to 7:30 pm. I hope you can join me.
Borders
I am still working on May’s Stitch Along piece. I found another piece of the green fabric in my cupboard the other day and was delighted because I really wanted to add a border onto the piece but didn’t have enough fabric – now I do.
This quilt I have not done traditionally but rather have built up on a piece of stabilizer by fusing all my pieces to the stabilizer. Now I will have to draft the borders to fit in with the geometric shapes created when I put the pieces of the quilt centre together.
Here is my drafting paper set up for one side of the quilt and part of the top and bottom. My table wasn’t wide enough to do the whole piece at once. If I had removed my sewing machines from my other table then I would have had a large enough space but I was too lazy.

Drafting the border with paper and pencil
A close up of the lines which follow outward from the couching lines in the centre of the quilt.

Continuing the couching lines into the border
The inner border is ¾″ and the outer border is 6 inches. I may decide to reduce the outer border once I determine if I indeed have enough fabric to do one this size and if not then probably a 3 inch border since the inner pieces are 9 x 12 inches. I’ll keep everything divisible by 3.
Well, I guess I had best get back to the design table and see how it all shapes up as this mini art quilt has turned into a much larger piece. So much fun!
Happy Quilting!


